Tuesday, 27 January 2015

My First Wheels

Ok, my first baby wheels literally was my brother's go Kart on which I would zoom swiftly around outside (circa 1976) This was a kid's dream...I loved it.

Hell on Wheels!!!!

My first proper wheels I got when I was 26 and it was my beloved 3 door Citroen Saxo 2000 in electric blue which I fondly christened Martha (doesn't everyone name their cars?) My dad bought Martha for me so in gratitude I made him a solemn vow to cherish my demure little runabout.

Martha & I

I treasured Martha and her manual sunroof that I had to wind up like a gramophone just to get a bit airflow inside as the air conditioning was a system solely dependent on how far down you wound her windows down in times of abject suffocation.
I studiously manned her stereo cassette system (yes tapes!) and played endless songs of Shakira (hip shaking was not an activity happily achieved in her limited space) whilst cruising the A10 with her windows rolled down.
I was not aware that owning a car that was key operated was uncool until a friend of mine casually remarked (from the comfort of her Audi) that she didn't realise they still made cars without a central locking system! (She is no longer my friend) Her seat adjustment was a dream as I managed to get my little 5ft 2 self as close to her wheel as I could without onlookers assuming that Ronnie Corbett was part owner.


I forgave her not so plush interior, her sombre pattern partially outlined with an electric blue fabric which wouldn't have looked out of place in an early Duran Duran video. It was acceptable in the 80's...

It looked alot like this..

This was of no matter to myself as my reliable little Martha served me well around North London with a smile on my face and room enough for my diminutive self even assisting me when I eventually moved out.

Know this, Martha may not have been expensive or glamorous. Nor did she possess a complicated technology and her vigorous booty shaking was more akin to a timid waggle, yet my curious little Martha was the most trusted friend I had who never let me down....except maybe when 13 years down the line the winder on her sun roof snapped and her exhaust fell out on the A303 on my way to Cornwall.


I relegated Martha to the scrap heap in the sky mourning her passing with a sausage roll and a smile. I then chose a shinier, sexier and more exotic model.....a Nissan Micra.

My best mate Martha

#Myfirstwheelscomp

Thursday, 16 October 2014

MY BEAUTIFUL BUNTING CAKE


BEAUTIFUL BUNTING CAKE: MY SHOWSTOPPER 


Here is my recipe for a lovely looking and very impressive show stopping Bunting Cake that makes even the grumpiest look gleeful.
It's a bit time consuming, a bit calorie laden, a bit messy and leaves your kitchen looking like the bomb squad has had a go at it but golly it's worth it.


Here we go, now pay attention.....

Preheat oven to 170oC (fan assisted)

Ingredients


Sponge:
  1. 350g self raising flour,sifted
  2. 350g soft marg, I use Stork it's great to work with
  3. 350g caster sugar
  4. 6 large eggs 
  5. 1 tablespoon vanilla extract
  6. A good dash of milk
  7. 6 different gel colours to colour your sponges

Decoration:
  1. 100g soft butter ( I don't use the Stork for this bit,I use the proper stuff)
  2. 300g soft cream cheese
  3. 600g sifted icing sugar
  4. Some drops of pink colouring

Method 

You're going to be making 6 separate sponges for this baby so ideally you would need 6x 8" sandwich tins, however I don't know anyone who has 6 of these , (I have 4) ,so I grease and line 4 of them and then bake the cakes 2 at a time and then begrudgingly I wash up the first 2 tins and grease and reline them and cook with them again...genius! Prepare everything beforehand.

PREP EVERYTHING.

1: In a mixer, cream together the Stork and sugar till pale.

2: Then I add an egg at a time followed by a spoon of flour and whisk,this prevents curdling (well that what Ms Berry says) Finish off by adding the last of the flour and the vanilla extract and using a metal spoon gently fold it all in. Regarding my egg situation, I always use free range because I happen to own 3 hefty chickens who lay big eggs constantly (see pic) and to be frank I have so many and my children are so sick of poached eggs for breakfast,boiled for lunch and scrambled for dinner that that they are beginning to wish for a gruesome chicken cull, for fear of morphing into human eggs. Tis nice to make a cake that needs loads of eggs so I can use the blighters  up!


3: When mixed, I sometimes add a bit of milk at this stage if it looks like you could grout your kitchen tiles with it just to loosen up and make it go a little further.

4: Next I use just about every bowl I own (except the toilet bowl) to divide the mixture into 6 bowls of equal quantity, I don't weigh it seeing as my patience wouldn't cope with that amount of methodology. Just guess and make it near enough.

5: Then you need to add your colours to make them well, colourful I use the Dr Oetker range because that's what I had and my local Lidl didn't seem to stock the posh ones so I used these. They're ok, but I do believe you can achieve brighter results with different brands if you can get them but these will suffice. Quantity wise I just kept adding a bit at a time and stirring until I started believing I was hallucinating on a bad trip.You could try a rainbow theme I.e Richard Of York Gave Battle In Vain and all that but if your colours end up a bit murky and dubious then the order might result more in a Richard Of Golders Green Plucked Leeches Valiantly or something...either way it's all still colourful and I'm sure Richard doesn't mind what he's plucking.....


6: Spoon your cake mix equally into your prepared tins and cook your cakes two at a time for around 20 minutes each or until springy. Don't panic if they don't look risen as they tend not to rise too much and remember you are stacking these so you don't want it taller than The Shard or you'll resemble a dribbling sloth when attempting to shove it in your mouth.


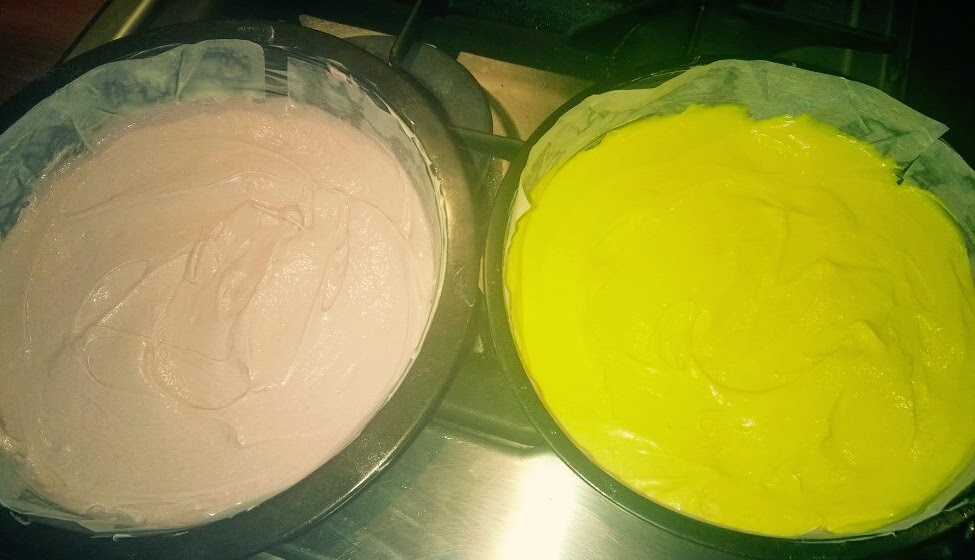
7: When your cakes are removed from the oven do not panic Mr Mainwaring if they look a bit pale and not as vivid (see pic) just have faith, when the sponges are assembled together the colours will become more apparent. Let them cool on a rack.


8: I now wrap mine in foil and chill for a while in the fridge as this makes them easier to ice and less fragile and also gives me time to have tea and hob nobs after all my diligent cooking.

9: Did I mention the mess, well yes it's messy however they've invented a fabulous contraption that washes up all the dirty stuff for you...use it!!!


10: Once you have finished the tea and half the packet of Hob Nobs you need to make the icing. Whisk up your soft butter in a bowl till smooth then add your cream cheese and whisk again.


11: Gradually add your sifted icing sugar and possibly a dash of lemon juice if you have it,this tames the sweetness. I like to add a few drops of pink colouring at this stage, purely because I like pink but if you don't you can add any colour or just leave it white,stir well with a wooden spoon, I know it hurts but who doesn't want biceps like Fatima Whitbread?


12: You can now chill the icing because it becomes easier to deal with when cooler.

13: Finally time to ice the masterpiece. Firstly glue the bottom base of the sponge with some icing onto your cake stand,this stops the blighter from running around the bottom. Next,carefully spread a thin layer of icing in between each sponge and stack em high baby! (Take the icing to the very edge,this way you will get good definition)


14: When all the sponges are assembled then continue with the icing to cover the entire cake using a palette knife. Don't just splodge it on, take a bit of time and care at this stage, it's worth it. Basically your cake is now finished but you can embellish it further if you like with coloured sprinkles or a few extra little swirly icing designs around the base. Either way it looks great because  the inside is more the the showpiece.


15: I love pretty bunting so I simply made my own bunting with 2 Cake pop sticks, some ribbon,glue and paper triangles. Incredibly simple and straightforward yet very effective and pretty. (See pic) So there you have my pretty Bunting Cake.


Good luck peeps and happy cooking.

Monday, 13 October 2014

My Fathers Day Cake Creation


Chef at Work

 Making beautiful pasta...

My take on a Christmas Cake..minus any peel!


Other Dishes


Limango Cake
My tasty invention of a delicious, moist cake based on the classic lemon drizzle cake but using hot mango with a zingy lime finish to it. (My other half loves it..)

Ingredients
6oz  (175g) self raising flour
6oz  (175g) stork margarine
6oz  (175g) caster sugar
2 free range eggs
3-4 tablespoons milk
Grated zest of two juicy limes plus the juice of a half of one lime
2 large ripe mangoes
1½oz icing sugar
Method

Preheat oven to gas mark 5 which is 190oC electric oven.

1.        Grease and line a 10 inch sponge clip tin with a loose bottom. (that’s the tin, not you )
2.      Beat together the margarine and caster sugar with an electric whisker till it looks a bit like the middle of a milky way bar.
3.      In a smaller bowl, beat the eggs and milk together and then add this slowly to the mixture.
4.      Sieve the flour and add the grated lime zest to it and then carefully fold this into your mixture.
5.      Slice the mangoes into as many thickish slices as you can discarding the skin.
6.      Place all these slices into the base of the tin covering as much of the base as possible.
7.      Pour all of the mixture over this and bake in the oven for 55-60 minutes or until the cake is nicely browned.
8.      When cooked, unclip the sides of the tin and release it. Turn the cake upside down on to a plate and carefully peel away the tin bottom and all the paper.
9.      It should be hot, steamy and bursting with juice by now, (definitely talking about the mango now)
10.  Finish off by mixing the icing sugar with the lime juice until smooth and runny. Drizzle this over the top while it’s warm and it gives a beautiful glaze with a limey tang.
11.  This is about it, you can garnish it with a little cut lime if you like. Most recipes say leave to cool but I like eating this warm perhaps with some vanilla ice cream or on its own. 
Enjoy…
________________________________________

Hearty Pesto and Chunky Chicken Broth

Ingredients
1 tablespoon olive oil
2 skin on chicken breasts
2 red onions, coarsely chopped
3 level tablespoons plain flour
2 pints chicken stock
Large tablespoon tomato puree
4oz mini pasta (farfalline)
4oz broccoli(cut into small trees)
2oz fine green beans(cut in half)
1 large carrot (diced)
4 teaspoons red pesto (chilli variety if you’re feeling spicy and maybe a little saucy)
Salt and Pepper
Method
1.Heat up your oil in a large pan and fry off your chicken breasts for about 5 minutes until golden.
2.Toss in your chopped onions that aren’t too finely chopped because they will burn otherwise. Fry all of this off for another 5 minutes until you start to smell that caramelised oniony whiff that we all love!
3.Sprinkle over your flour so all the juices absorb into it and keep stirring.(add a small bit of liquid in case it goes too thick)
4.Beforehand,in a jug, combine the stock and tomato puree and season it and then pour all of this into your pan. Listen to the sizzle......(if it doesn’t sizzle just turn up the heat and go SSSSZZZZZ yourself....) Bring all of this to a rollicking boil, stirring lots and then turn down the heat, put a lid on it (the pan not you) and simmer for about 10 to 15 minutes.
5.The chicken should be cooked enough by now, so remove it and place aside for a minute. Turn up the heat and get the boiling going again and then throw into the pan your mini pasta shapes and cook them off.(mini pasta only takes about 5 mins to cook) lower the heat once it gets going.
6 While this happens, cut up the chicken breasts into chunky bits, I don’t eat the skin but you can leave it if you like it.

Waste Not

Pauper’s Pud!
This is my take on a classic bread & butter pudding. It amasses itself into a great, steaming mound of fruity, chocolatey loveliness. Instead of using just bread I use stale old hot cross buns or leftover chocolate sponges or cakes. It’s also a fantastic opportunity to use up the leftover remnants at the bottom of cereal boxes that don’t stretch to a whole bowlful. Also using over ripened fruit from the fruit bowl because when baked it seems to caramelise and go all juicy. Mixed with an odd chocolate chunk or two, it’s just heavenly. I call it Pauper’s Pud because it’s primarily made from items that would otherwise be thrown away.
Ingredients
12oz leftover (preferably stale) Hot Cross buns/muffins/old chocolate sponge cake, torn into chunks
12fl oz milk
2oz sugar (brown or white, whatever you have)
2oz butter melted
2 teaspoons of mixed spice
2 eggs beaten
2 or 3  leftover fruits in the fruit bowl (apple, dates, pear or plum, preferably on the turn) peeled & chopped into bite sized chunks 
Some spare chocolate buttons or similar chocolate chunks 
Handful of remnants of any crunchy cereal (Honey Nut Clusters or Crunchy oats)
Sprinkling of Demerera sugar if you have, normal will do otherwise
Grated nutmeg
Method
Preheat oven to Gas Mark 5, 200 C.
Butter a big baking dish that holds about 2 pints.
Into a large bowl, throw in all of your chunks of hot cross buns, muffins and stale chocolate sponge and pour over all of the milk so all the chunks absorb all the milk. Usually I leave it about 20 minutes.
Then add your chunks of soft fruits and also your melted butter, mixed spice, sugar, chocolate buttons and the beaten egg.
Gently combine all of these so it is mixed well.
Put this mixture into your buttered dish and finally sprinkle over a couple of spoons of Demerera sugar and crunchy cereal to give it a nice crisp and crunchy topping.
Finally sprinkle on some nutmeg to finish.
Bake for about 40- 50 minutes or until it is golden and bubbly.
Serve with vanilla ice cream or simply on its own.
ok, it looks a bit of a state but it's lovely, honest!! ___________________________________________

Desserts


Fresh Warm Bread

Strawberry and Raspberry Lemony Cheesecake

Blueberry Muffins
______________________________
It's better to know some of the questions than all of the answers..